
Profile Form
Define custom profile fields and avatar upload settings so you can collect extra customer data from the My Account page and the WordPress admin user profile.
Availability: Free
Page Navigation
- Current guide: Profile Form
- Where to open it: WordPress Admin -> ArraySubs -> Profile Builder
- Direct route:
/wp-admin/admin.php?page=arraysubs-mainadmin#/profile-builder/profile-form - Section overview: Open overview
- Previous guide: my-account-editor
- Next guide: README
- Troubleshooting: Audits, Logs, and Troubleshooting
Overview
The Profile Form settings page lets you create custom fields that appear on two surfaces:
- Customer-facing — The WooCommerce My Account → Account Details page, where customers fill in their own data.
- Admin-facing — The WordPress Admin → Users → Edit User profile screen, where administrators can view and edit the same data.
You can also enable avatar upload, letting customers replace their Gravatar with a custom profile photo.
All profile data is stored as WordPress user meta with the prefix arraysubs_pf_, and changes are tracked in the activity audit log.
When to Use This
- You need to collect business-specific information from subscribers (company name, job title, membership ID, dietary preferences, etc.).
- You want customers to upload a profile photo instead of relying on Gravatar.
- You want uploaded files from customers (ID verification, signed agreements, portfolio samples).
- You need extra data fields visible to your support team on the admin user profile screen.
Prerequisites
- ArraySubs installed and active.
- WooCommerce My Account page set up (default WooCommerce behavior).
- Admin or Shop Manager access.
How It Works
When you create profile fields, they are saved as a configuration in your site database. The fields automatically render on the WooCommerce Account Details form and on the WordPress admin user edit screen. When a customer or admin saves the form, each field value is stored as individual user meta.
Avatar upload works independently from custom fields. When enabled, a photo upload section appears above the custom fields on the customer account page and in the admin user profile. Avatars are stored in a protected upload directory (wp-uploads/arraysubs-avatars/) and replace the default Gravatar across your site.
Steps / Configuration
Opening the Profile Form Page
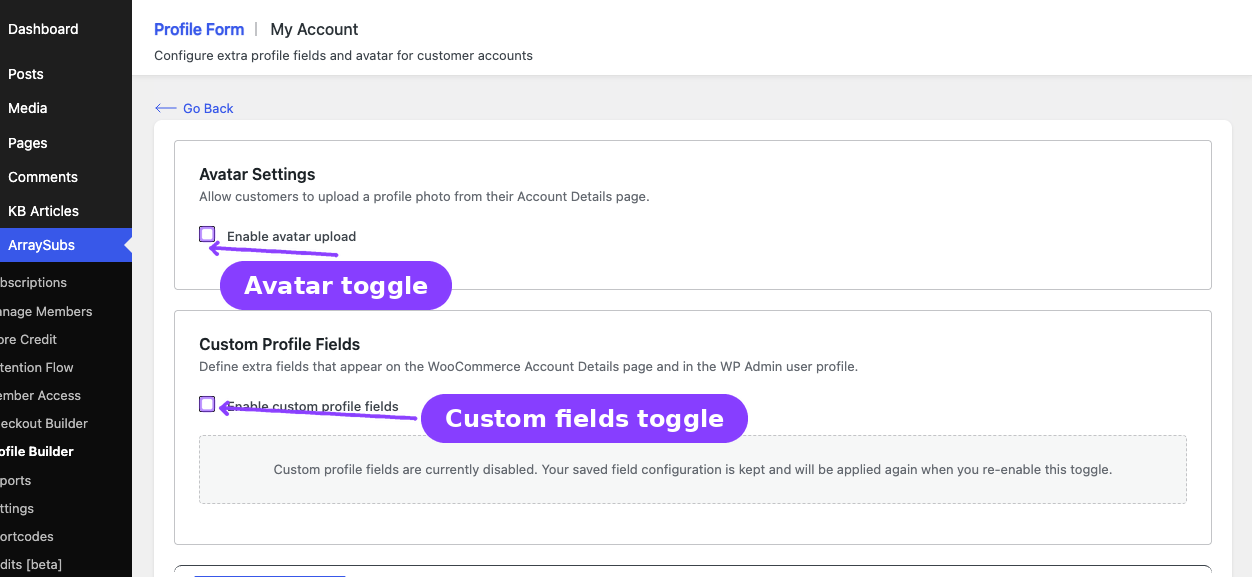
- Go to ArraySubs → Profile Builder → Profile Form.
- The page has two sections: Avatar Settings and Custom Profile Fields.
Avatar Settings
The avatar section controls whether customers can upload a profile photo from their account page.
Configuring Avatar Upload
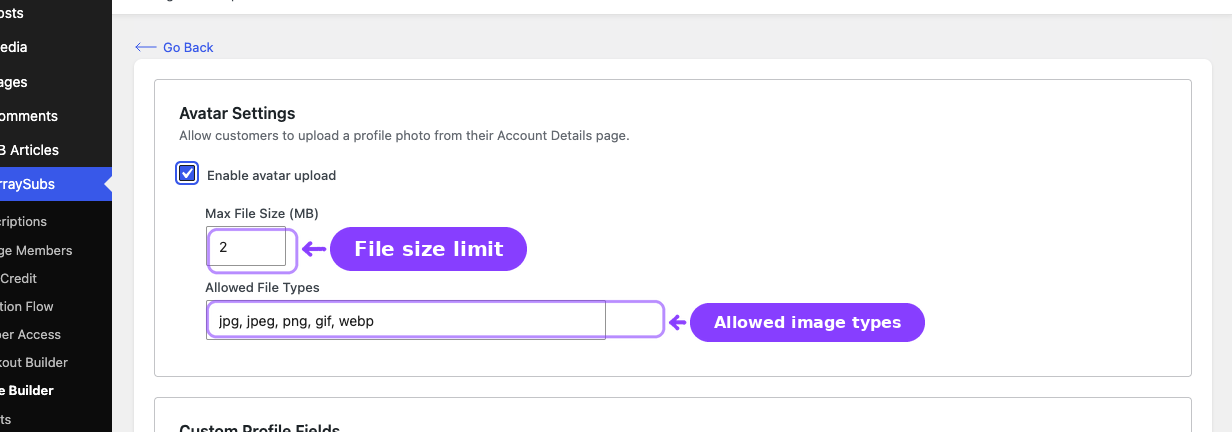
- Toggle Enable avatar upload to on.
- Set the Max File Size (MB) — the maximum file size customers can upload. Accepts values from 1 to 20 MB. Default is
2MB. - Set the Allowed File Types — a comma-separated list of file extensions customers can upload. Default is
jpg, jpeg, png, gif, webp. - Click Save Configuration.
What Customers See
When avatar upload is enabled, customers see a Profile Photo section at the top of their My Account → Account Details page:
- A preview of their current avatar (or Gravatar if no custom photo is set).
- An Upload Avatar button to select a photo from their device. After uploading, this changes to Change Avatar.
- A Remove Avatar button that appears only when a custom avatar is already set. Removing the avatar falls back to the Gravatar image.
The upload happens instantly via the REST API — no page reload required. Validation errors (file too large, wrong file type) appear inline below the preview.
What Admins See
On the WordPress Admin → Users → Edit User screen, a section titled ArraySubs Profile Fields shows the avatar upload:
- A 96×96 preview of the current avatar (or Gravatar fallback).
- A file input to upload a new avatar.
- A Remove avatar checkbox that appears when a custom avatar exists.
- A help note showing the maximum file size.
How Avatars Are Stored
- Files are saved to
wp-uploads/arraysubs-avatars/with the format{user_id}-{random}.{ext}. - The directory is protected with
.htaccessrules to prevent direct browsing. - Only the filename is stored in user meta (
arraysubs_avatar). The system constructs the full URL at runtime. - When a customer removes their avatar, the file is deleted from disk and the meta is cleared. The Gravatar URL is used as fallback.
Avatar Settings Reference
| Setting | What It Controls | Default | Accepted Values |
|---|---|---|---|
| Enable avatar upload | Whether the avatar section appears for customers and admins | On | On / Off |
| Max File Size (MB) | Maximum upload size per avatar file | 2 | 1 – 20 |
| Allowed File Types | File extensions customers can upload | jpg, jpeg, png, gif, webp | Any valid image extensions, comma-separated |
Custom Profile Fields
The custom fields section lets you define extra form fields that appear on both the customer account page and the admin user profile.
Enabling Custom Fields
- Toggle Enable custom profile fields to on.
- The field editor area appears below.
Adding a Field
- Click Add Field at the bottom of the field list.
- A new field row appears with default settings.
- Click the expand arrow on the right to open the field editor.
- Fill in the field details (see field properties below).
- Click Save Configuration when done.
Field Properties
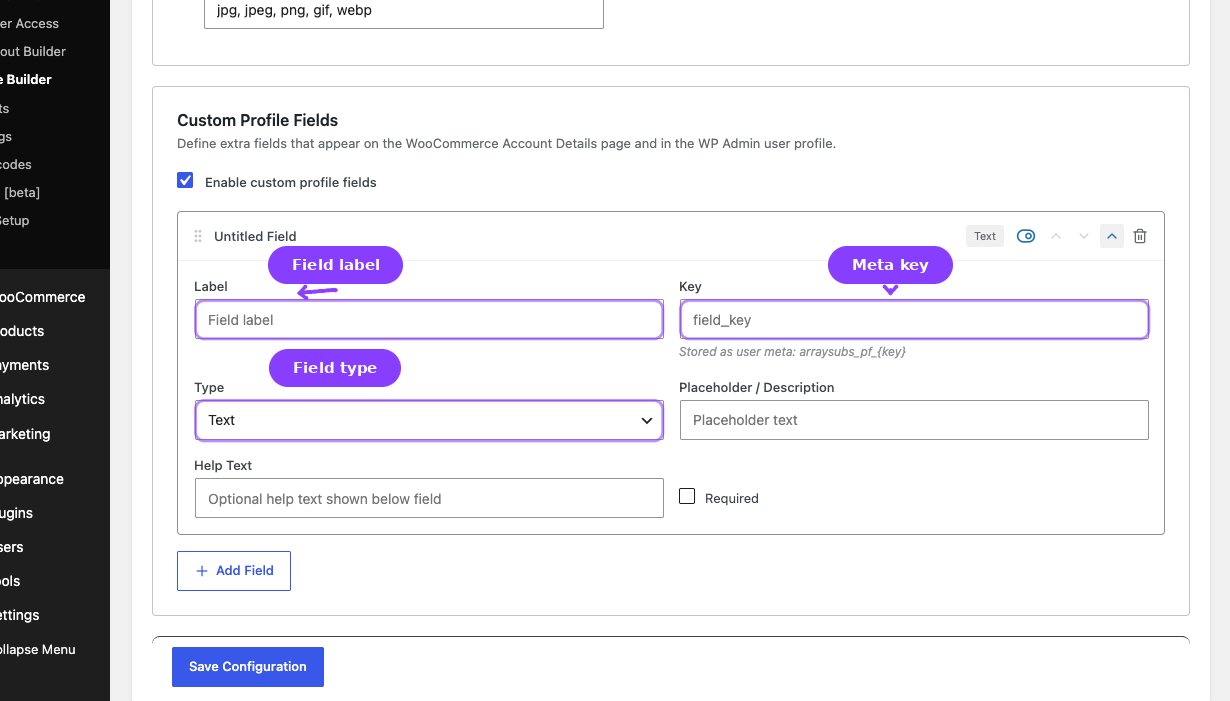
Every field has these common properties:
| Property | Description | Required |
|---|---|---|
| Label | The visible name shown to customers and admins. | Yes |
| Key | The storage identifier. Auto-generated from the label (lowercase, underscores). Can be manually edited. Stored as arraysubs_pf_{key} in user meta. |
Yes |
| Type | The kind of input (see field types below). | Yes |
| Placeholder / Description | Hint text shown inside the field (for text, textarea, date) or descriptive label (for checkbox). | No |
| Help Text | Additional guidance shown below the field. | No |
| Required | Whether the field must be filled in before saving. | No |
Field Types
ArraySubs supports six field types:
Text
A single-line text input. Best for short values like names, IDs, or titles.
- Renders as
<input type="text">on the frontend and admin. - Supports placeholder text.
- Sanitized with
sanitize_text_field().
Textarea
A multi-line text area. Best for longer entries like bios, notes, or descriptions.
- Renders as a
<textarea>with 4 rows. - Supports placeholder text.
- Sanitized with
sanitize_textarea_field().
Select
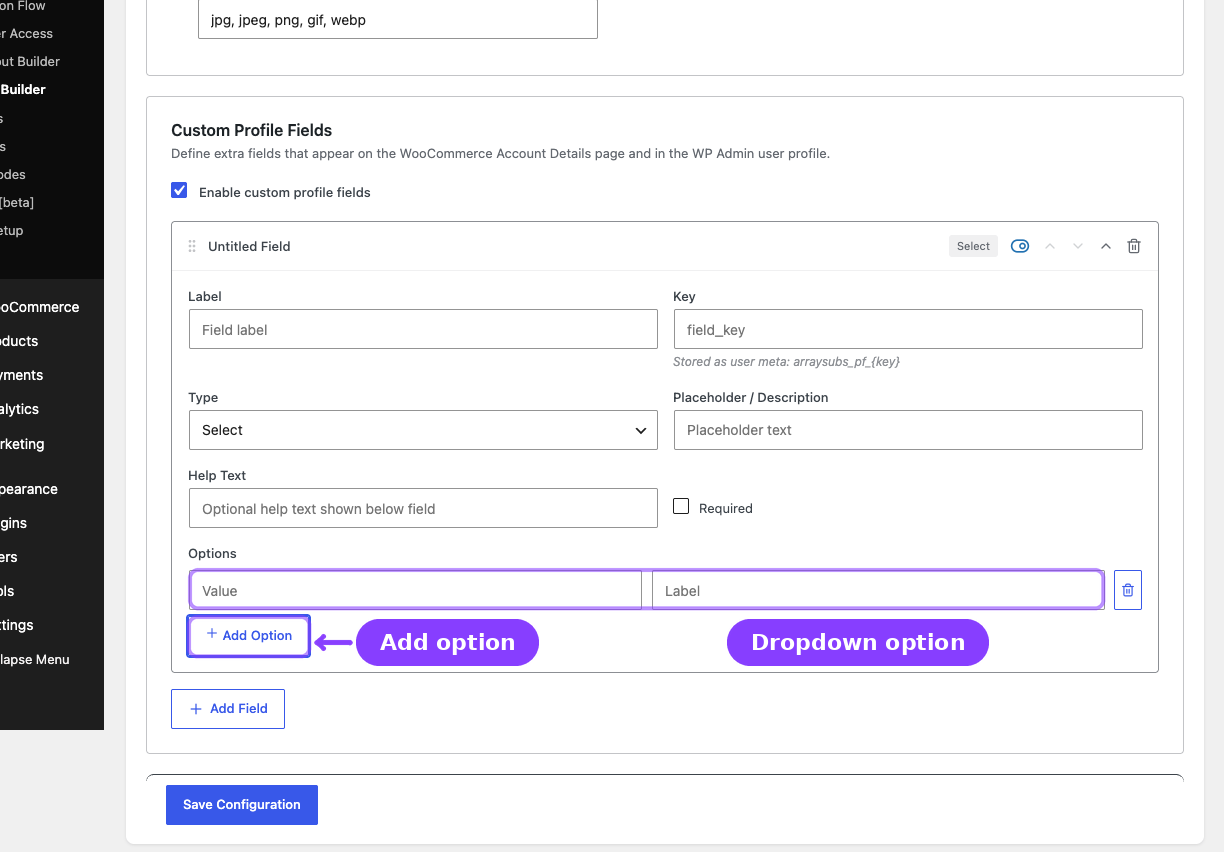
A dropdown menu with predefined options. Best for controlled choices like departments, industries, or plan reasons.
- Requires at least one option.
- Each option has a Value (stored) and a Label (displayed).
- Add options using the Add Option button in the field editor.
- The stored value is validated against the defined options.
Date
A date picker input. Best for birthdates, anniversary dates, or enrollment dates.
- Renders as
<input type="date">. - Stored in
YYYY-MM-DDformat. - Validated with a date format regex.
Checkbox
A single on/off toggle. Best for consent flags, preferences, or yes/no questions.
- Renders as a single
<input type="checkbox">. - The Placeholder / Description property is used as the checkbox label.
- Stored as
1(checked) or0(unchecked). - Cannot be marked as required (submissions without the checkbox checked are valid).
File Upload
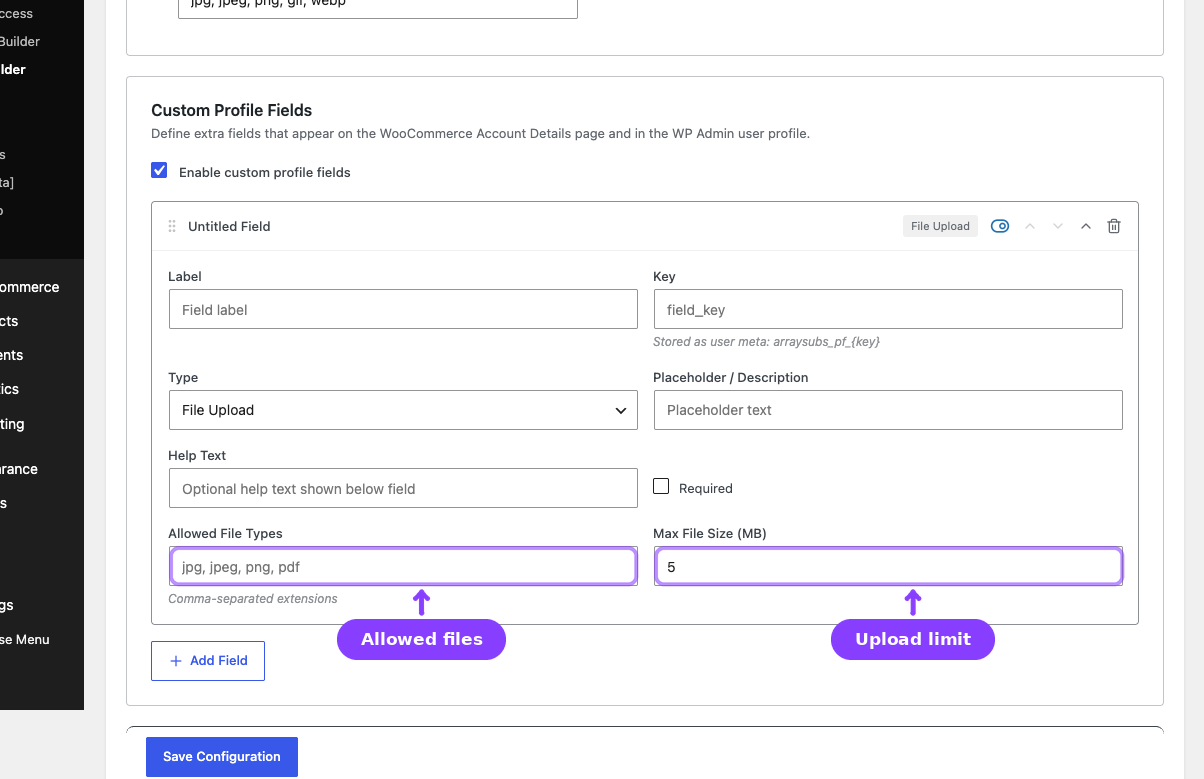
A file input for document or image uploads. Best for ID verification, signed agreements, certificates, or portfolios.
- The field editor shows two extra settings:
- Allowed File Types — Comma-separated extensions. Validated against a whitelist of safe types:
jpg, jpeg, png, gif, webp, pdf, doc, docx, xls, xlsx, csv, txt, zip. - Max File Size (MB) — From 1 to 100 MB. Default is
5MB.
- Allowed File Types — Comma-separated extensions. Validated against a whitelist of safe types:
- Uploaded files are stored in
wp-uploads/arraysubs-profiles/{user_id}/. - The directory is protected with
.htaccess(deny all direct access). - Only the filename is stored in user meta.
- On the admin screen, existing files show a download link and a Remove file checkbox.
- On the customer account page, existing files show the filename and a remove button.
Managing Fields
Each field row in the editor shows:
| Element | What It Does |
|---|---|
| Drag handle | Drag to reorder fields. The order here determines the display order on customer and admin screens. |
| Field label | Shows the current label (or "Untitled Field" if empty). |
| Type badge | Shows the field type. |
| Enable/Disable toggle | Hides the field from forms without deleting it. Disabled fields keep their stored data. |
| Move Up / Move Down | Reorder without dragging. |
| Expand / Collapse | Open the detail editor. |
| Delete | Remove the field definition entirely. Existing user data for deleted fields remains in the database. |
Field Key Rules
- Auto-generated from the label: lowercase, non-alphanumeric characters replaced with underscores, max 40 characters.
- Can be manually edited after creation, but changing a key after data has been collected creates a new meta key (old data remains under the old key).
- Keys must be unique across all fields.
- Stored as
arraysubs_pf_{key}in user meta. For example, a field with keycompany_nameis stored asarraysubs_pf_company_name.
Where Profile Data Appears
Customer Account Page
Custom fields appear on My Account → Account Details, below the standard WooCommerce account fields (first name, last name, display name, email, password). The avatar section appears above the custom fields.
Customers fill in the fields and click Save changes (the standard WooCommerce button). Validation errors appear inline — for example, if a required field is empty.
Admin User Profile
Custom fields appear on WordPress Admin → Users → Edit User (and on the user's own Profile page) under a section titled ArraySubs Profile Fields. The avatar section comes first, followed by each custom field in the configured order.
Admins can view and edit all fields for any user. Fields are saved when the admin clicks Update User (or Update Profile on their own profile).
Fields also appear on the Add New User page, letting admins set initial values when creating users.
Admin User Create Page
When creating a new user at WordPress Admin → Users → Add New, the custom profile fields appear so admins can pre-fill data at user creation time. The avatar section is not shown on the create page (since the user does not exist yet).
Real-Life Use Cases
Use Case 1: Collecting Business Information
A B2B subscription store needs the customer's company name, job title, and tax ID. Create three text fields (Company Name, Job Title, Tax ID) and mark Tax ID as required. Customers fill these in from their account page, and your team can review them on the admin user profile.
Use Case 2: Member Photo Directory
An association membership site wants member photos for a directory. Enable avatar upload so members upload their own photos. The avatars replace Gravatar site-wide, appearing in comments, author bios, and any theme that uses get_avatar().
Use Case 3: Document Collection
A professional certification subscription requires members to upload proof of qualifications. Add a file upload field with allowed types set to pdf, jpg, png and max size 10 MB. Members upload from their account page, and admins review files from the user profile screen.
Use Case 4: Dietary Preferences for Subscription Boxes
A food subscription box needs dietary information. Add a select field with options like "No restrictions," "Vegetarian," "Vegan," "Gluten-free," and "Keto." Mark it as required so every subscriber provides this information.
Edge Cases and Important Notes
- Disabling a field does not delete data. Toggling a field off hides it from forms but keeps existing user meta values intact. Re-enabling the field shows the previously saved data.
- Deleting a field does not delete user data. If you delete a field definition and later create a new field with the same key, the old data will appear again.
- File upload fields require multipart form encoding. The system automatically adds
enctype="multipart/form-data"to the account form and admin user form when profile fields are active. - Avatar files are site-specific. In a WordPress multisite environment, avatars are stored per site, not shared across the network.
- Gravatar is the fallback. When no custom avatar is set, the system falls back to the user's Gravatar. If the user has no Gravatar, WordPress displays the default avatar configured in Settings → Discussion.
- Audit logging. All changes to profile fields (including avatar changes and address updates) are tracked in the ArraySubs activity audit log. The system records the old and new values, the field label, and who made the change.
- Avatar directory security. The
arraysubs-avatars/directory is protected with.htaccessrules and anindex.phpfile to prevent directory listing, but avatar URLs are accessible by direct link. Do not use this for sensitive documents — use file upload fields instead, which store files in a directory withdeny allrules.
Troubleshooting
| Problem | Likely Cause | What to Do |
|---|---|---|
| Custom fields do not appear on the customer account page | Feature is disabled or no fields are enabled | Check that Enable custom profile fields is on and at least one field is toggled to enabled |
| Avatar upload button does not appear | Avatar feature is disabled | Toggle Enable avatar upload on in Profile Form settings |
| Customer sees "File size exceeds limit" error | File is larger than the configured max size | Increase Max File Size in Avatar Settings, or ask the customer to compress the image |
| Customer sees "Invalid file type" error | File extension is not in the allowed list | Add the extension to Allowed File Types in Avatar Settings |
| Field data does not save on the admin user profile | Nonce verification failed or field key changed | Refresh the admin page and try again. If the key was changed, the old data is under the old key |
| Upload field shows "Remove file" but no download link on admin | The file was deleted from disk but meta remains | The customer or another admin may have removed the file. The meta clears on next save |
| Fields appear in wrong order | The field list was reordered after initial save | Re-open Profile Form, drag fields to the desired order, and save again |
Related Guides
- My Account Editor — Customize the My Account navigation menu
- Shortcodes — Display user data and gated content with shortcodes
- Customer Portal — Portal Pages — What customers see in their subscriptions area
- Manage Members — Member Lookup and Profiles — View member profiles from the admin panel
FAQ
Do custom profile fields work with WooCommerce checkout?
No. Profile fields are designed for the My Account → Account Details page and the admin user profile. They do not appear at checkout. For checkout field customization, see Checkout Builder Pro.
Can I make the avatar field required?
No. Avatar upload is optional by design. You can encourage customers to upload a photo, but the system does not block account saves when no avatar is set.
What happens if I change a field's key after collecting data?
Changing a key creates a new user meta entry. Existing data stays under the old key and will no longer appear in the field. If you need to rename a key, consider exporting user data first and updating meta manually.
Can customers see fields from other customers?
No. Each customer can only view and edit their own profile fields on the account page. Field data is private user meta.
Does disabling the "Enable custom profile fields" toggle delete saved data?
No. It only hides the fields from the account page and admin profile. All stored user meta values remain unchanged.
Where are uploaded files stored?
Avatar images are stored in wp-uploads/arraysubs-avatars/. File upload field attachments are stored in wp-uploads/arraysubs-profiles/{user_id}/. Both directories have security protections, but file upload directories use stricter deny all access rules.
Can I use profile field data in emails?
Profile field values are stored as standard WordPress user meta. Any email system that supports user meta placeholders can access them using the key format arraysubs_pf_{field_key}.
Is there a limit to how many fields I can create?
There is no hard limit. However, too many fields on the account page can create a poor customer experience. Keep the form focused on essential information.