
First-Time Setup
A step-by-step checklist to go from a fresh install to a working subscription product with a test order and a verified customer portal.
Availability: Free + Pro
Page Navigation
- Current guide: First-Time Setup
- Where to open it: WordPress Admin -> ArraySubs
- Section overview: Open overview
- Previous guide: essential-daily-workflows
- Next guide: import-export-settings
- Troubleshooting: Audits, Logs, and Troubleshooting
Overview
This guide walks you through the initial setup of ArraySubs. By the end, you will have a live subscription product, a completed test order, and a working customer portal. Follow the steps in order — each one builds on the previous.
Prerequisites
- WordPress 6.0 or higher installed and running.
- WooCommerce 8.0 or higher installed and activated.
- PHP 8.1 or higher on your hosting environment.
- Admin or Shop Manager access to the WordPress dashboard.
- At least one WooCommerce payment method configured (even "Cash on Delivery" or "Check Payments" for testing).
Step 1 — Install and Activate the Plugins
Core plugin
- Go to Plugins → Add New in your WordPress admin.
- Upload or search for ArraySubs.
- Click Install and then Activate.
Pro addon (optional)
- Upload the ArraySubsPro plugin file through Plugins → Add New → Upload Plugin.
- Click Install and then Activate.
Always activate the core plugin first. The Pro addon will not activate without ArraySubs core already running.
After activation, you will see a new ArraySubs menu item in the WordPress admin sidebar.
Step 2 — Review General Settings
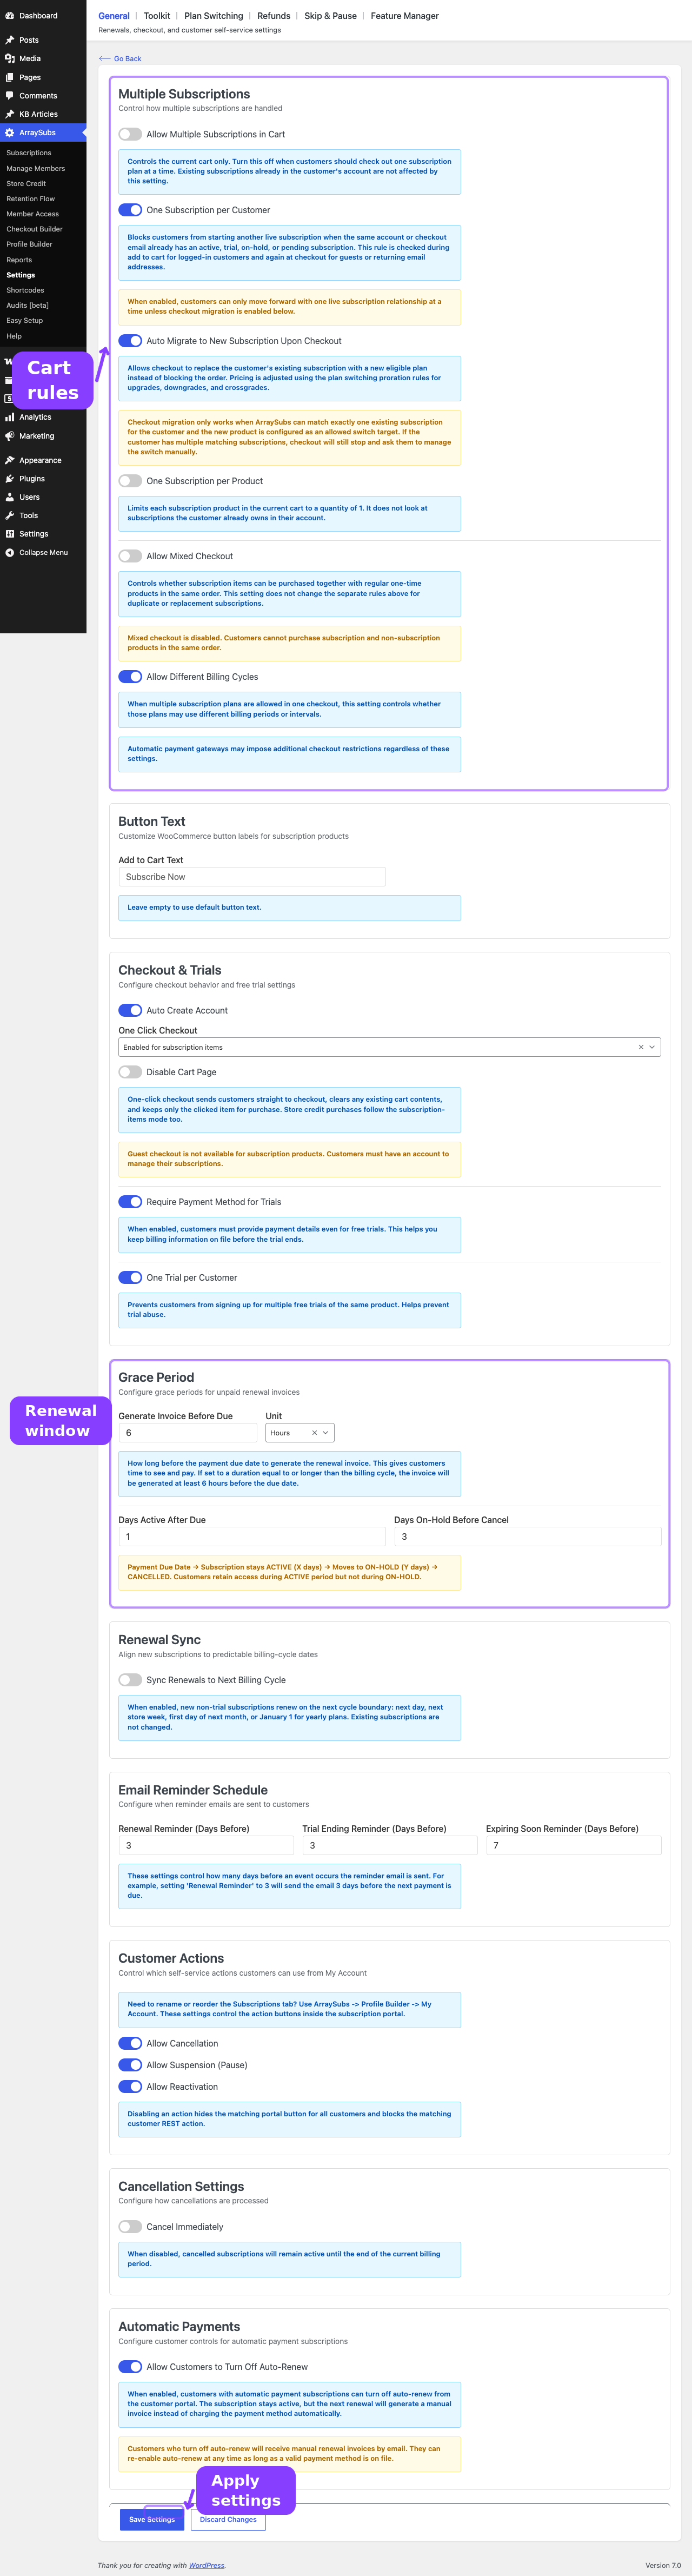
- Go to ArraySubs → Settings → General.
- Walk through each section and adjust based on your store's needs. For a first-time setup, the defaults work well for most stores. Here is what to pay attention to:
Multiple Subscriptions
The default allows customers to have multiple subscriptions in their cart and on their account. If you want to restrict this, adjust these toggles:
| Setting | Default | What it does |
|---|---|---|
| Allow multiple in cart | On | Customers can add several subscription products to one cart |
| One per customer | Off | When on, each customer can only hold one active subscription at a time |
| One per product | Off | When on, a customer can only subscribe to the same product once |
| Allow mixed cart | On | Subscription and non-subscription items can be in the same cart |
| Allow different billing cycles | On | Multiple subscriptions with different billing schedules can coexist in one cart |
Grace Period
The grace period determines how long the system waits before changing a subscription's status when a renewal payment is overdue.
| Setting | Default | What it does |
|---|---|---|
| Active grace days | 3 | Days the subscription stays Active after a missed payment |
| On-hold grace days | 7 | Days the subscription stays On Hold before automatic cancellation |
For testing, the defaults are fine. Adjust these once you understand your payment flow.
Customer Portal Actions
These settings control what customers can do from their My Account → Subscriptions page.
Want to rename or move the Subscriptions tab itself? Do that later in ArraySubs → Profile Builder → My Account.
| Setting | Default | What it does |
|---|---|---|
| Allow cancellation | On | Customers can cancel their own subscriptions |
| Allow suspension | Off | Customers can pause their subscriptions (when skip/pause is configured) |
| Allow reactivation | On | Customers can reactivate cancelled subscriptions |
Payment-method updates for automatic subscriptions are handled by compatible gateways and are not toggled from General Settings.
Trials
| Setting | Default | What it does |
|---|---|---|
| Require payment method | On | Customers must enter a payment method even for free trials |
| One trial per customer | On | Prevents the same customer from starting multiple free trials |
- Click Save Changes when done.
You can always come back to these settings later. Nothing here is permanent — all settings can be changed at any time and apply to future actions.
Step 3 — Create Your First Subscription Product
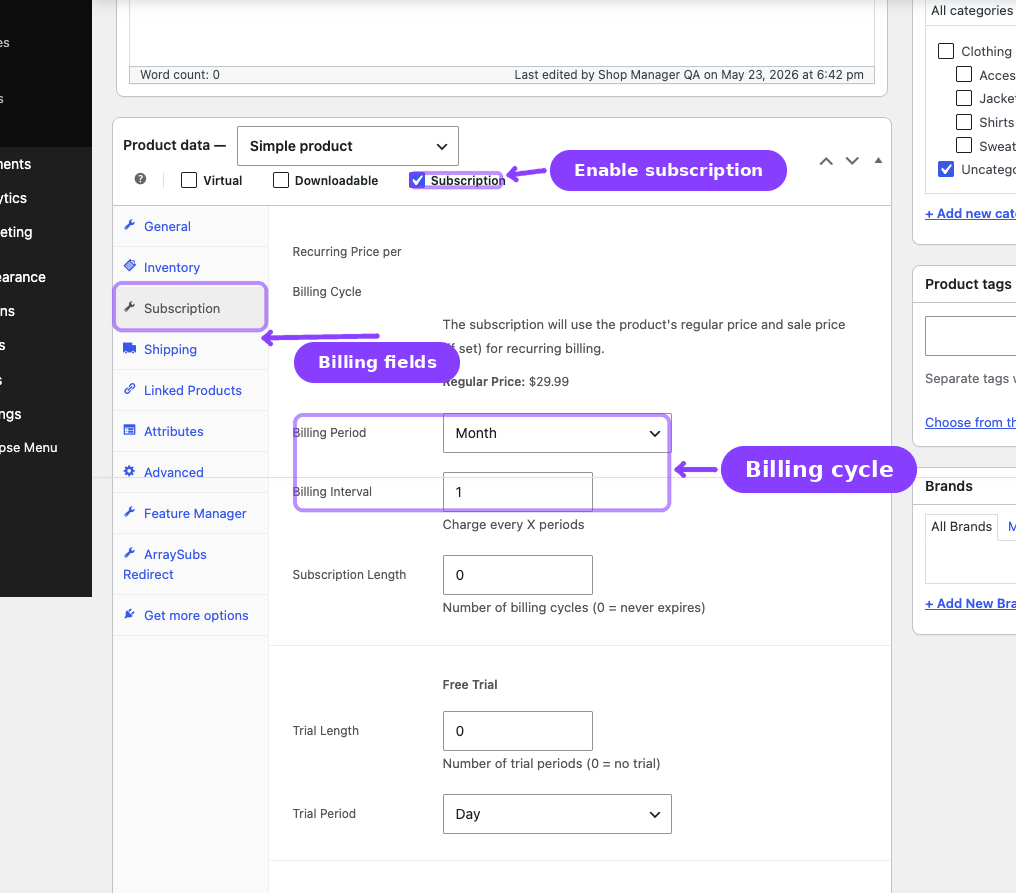
- Go to Products → Add New in WooCommerce.
- Enter a product name (e.g., "Monthly Membership").
- Set a regular price (e.g., $29.99).
- In the Product data section, check the Subscription checkbox near the top (next to Virtual and Downloadable).
A new Subscription tab appears in the product data panel.
- Open the Subscription tab and configure:
| Field | Recommended value | Description |
|---|---|---|
| Billing Period | Month | How often the customer is charged |
| Billing Interval | 1 | Charge every 1 month |
| Subscription Length | 0 | Never expires (0 = unlimited) |
| Trial Length | 0 | No trial for a first test (set to 0) |
| Trial Period | Day | Unit for trial length (irrelevant when trial is 0) |
| Sign-up Fee | 0 | No one-time fee for a first test |
- Click Publish to save the product.
Your subscription product is now live and visible in your store catalog.
Optional: Variable subscription product
If you want to offer multiple plans (e.g., Monthly and Annual), create a Variable product instead:
- Choose Variable product as the product type.
- Check the Subscription checkbox.
- Create attributes (e.g., "Plan" with values "Monthly" and "Annual").
- Generate variations.
- For each variation, open it and configure the subscription fields (billing period, interval, price, trial, etc.) independently.
Each variation acts as a separate subscription plan under the same product.
Step 4 — Place a Test Order
- Open your store's frontend in a new browser tab (or use an incognito window).
- Navigate to the subscription product you just created.
- Click the add-to-cart button (labeled "Subscribe Now" by default).
- Proceed to checkout.
- Fill in the billing details using test data.
- Select a payment method and complete the order.
For testing, you can use a manual payment method like "Check Payments" or "Cash on Delivery." This lets you complete the order without a live gateway. If you have Stripe test mode or PayPal sandbox configured, use those instead.
- After placing the order, go to WooCommerce → Orders and mark the order as Processing or Completed.
When the order is paid, ArraySubs automatically creates a subscription linked to that order.
Step 5 — Verify the Subscription
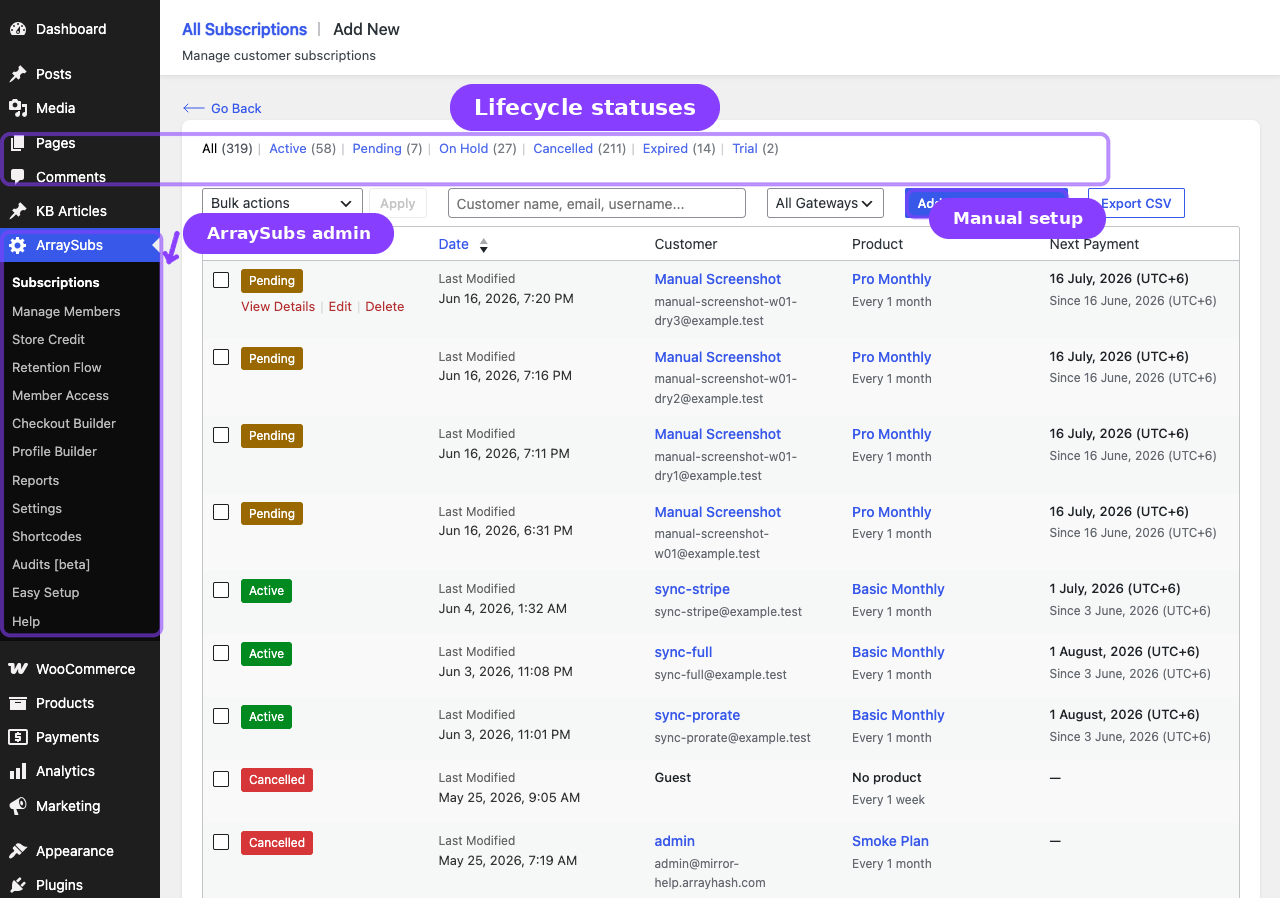
- Go to ArraySubs → Subscriptions (or click All Subscriptions in the ArraySubs menu).
- You should see your new subscription in the list with status Active (or Trial if you added a trial).
- Click on the subscription to open the detail page.
What to check on the detail page
| Section | What to verify |
|---|---|
| Info card | Status shows Active, correct start date and next payment date |
| Customer info | Correct customer name and email |
| Product card | Correct product name, variation (if applicable), quantity, and recurring price |
| Billing info | Correct billing period, interval, and recurring amount |
| Addresses | Billing and shipping addresses match the checkout data |
| Related orders | The initial order appears with the correct total |
Step 6 — Review the Customer Portal
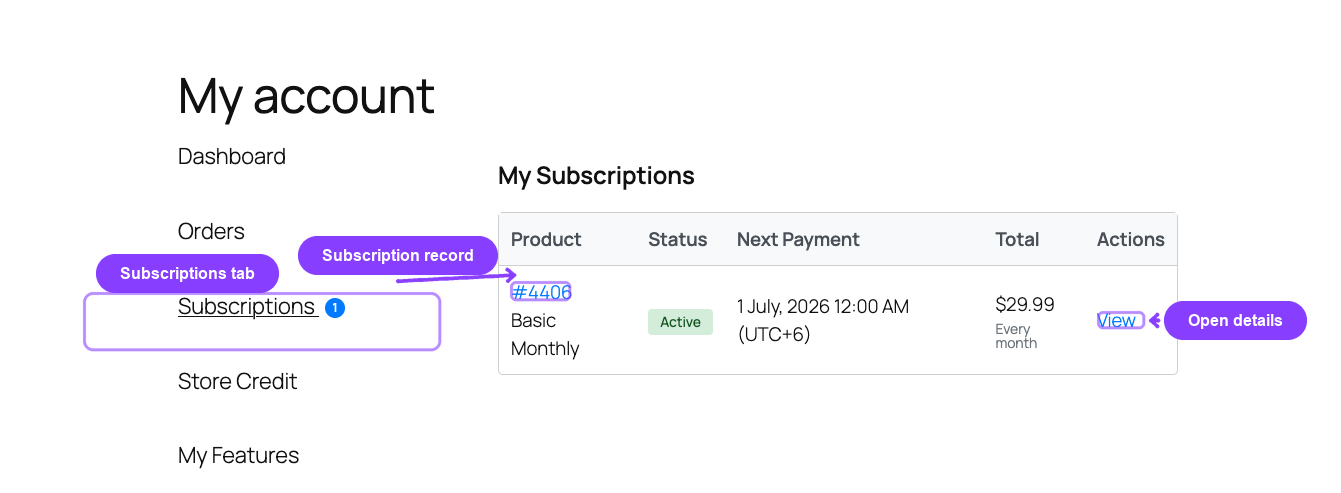
- Log in as the test customer (or use Login as User from the customer's WordPress profile if available).
- Go to My Account → Subscriptions.
- Verify the subscription list shows the correct product, status badge, next payment date, and total.
- Click View to open the subscription detail page.
What to check on the customer portal
| Element | What to verify |
|---|---|
| Subscription table | Product name, status, next payment, billing total are correct |
| Detail page | Overview table shows dates, billing schedule, and status |
| Action buttons | Available actions match your General Settings (cancel, reactivate, etc.) |
| Related orders | The initial order appears in the orders section |
Step 7 — Quick Settings Verification
After your test order, verify these additional areas are working:
Email notifications
Go to ArraySubs → Settings → General and scroll to the email section. By default, these emails are enabled:
| New subscription (admin + customer) | Subscription activated |
| Renewal reminder | Renewal invoice |
| Payment received | Payment failed |
| Subscription on-hold | Subscription cancelled |
| Subscription expired | Trial started / converted |
Check your test customer's inbox (or the admin inbox) for the new subscription email. If no email arrived, check your WordPress email configuration (SMTP plugin, mail logs, etc.).
Admin menu walkthrough
Take a quick tour of the ArraySubs admin menu to familiarize yourself with the available pages:
| Menu Item | Purpose |
|---|---|
| Subscriptions | View, create, edit, and manage all subscriptions |
| Retention Flow | Configure cancellation reasons and retention offers |
| Member Access | Set up role mapping, content restrictions, and access rules |
| Profile Builder | Customize profile fields and My Account menu |
| Settings | General, Toolkit, Plan Switching, and Refunds configuration |
| Shortcodes | Reference page for all available shortcodes |
| Help | Support contact information |
If the Pro addon is active, you will also see:
| Menu Item | Purpose |
|---|---|
| Manage Members | Member profiles, insights, and admin tools Pro |
| Store Credit | Credit management, history, and settings Pro |
| Audits | Activity audit logs and scheduled job logs Pro |
What Happens After Saving
After completing these steps, your store is ready for real customers:
- Subscription products appear in your catalog with billing schedule information displayed on the product page, cart, and checkout.
- When a customer purchases a subscription product, a subscription is created automatically.
- Renewal invoices are generated automatically (6 hours before the payment due date, by default).
- The grace period system monitors overdue payments and manages status transitions.
- Customers can manage their subscriptions from My Account → Subscriptions.
- All configured email notifications fire at the appropriate lifecycle events.
Real-Life Use Cases
Use Case 1: Simple Monthly Membership
A fitness studio sells online class access for $19.99/month with no trial and no signup fee. Create one simple subscription product with Monthly billing and a $19.99 price. Customers subscribe, get access, and are billed every month automatically.
Use Case 2: Annual Plan with Trial
A SaaS tool offers a 14-day free trial followed by $99/year billing. Create a subscription product with a Year billing period, $99 price, and a 14-day trial. New customers get immediate access during the trial, then are billed annually.
Use Case 3: Tiered Variable Product
A coaching platform offers Bronze ($29/month), Silver ($49/month), and Gold ($99/month) tiers. Create a variable subscription product with a "Tier" attribute, three variations, and different prices on each. Customers choose their tier at checkout.
Troubleshooting
| Problem | Likely Cause | What to Do |
|---|---|---|
| No Subscription tab appears on the product editor | WooCommerce is not active or plugin is not activated | Verify both WooCommerce and ArraySubs are activated in Plugins |
| Subscription is not created after checkout | Order was not marked as paid | Mark the order as Processing or Completed in WooCommerce → Orders |
| Customer does not see the Subscriptions tab in My Account | Permalink settings need to be refreshed | Go to Settings → Permalinks and click Save Changes (without changing anything) |
| Email notifications are not arriving | WordPress email is not configured properly | Install an SMTP plugin and check your server's mail configuration |
| Pro features are not visible | Pro addon is not activated or core plugin is outdated | Verify both plugins are active and ArraySubs core is version 1.0 or higher |
Related Guides
- Before You Launch — Requirements, core concepts, and feature map.
- Easy Setup Wizard — Prefer a guided setup? Use the wizard to configure settings by answering plain-language questions.
- Import / Export Settings — Back up your configuration or migrate settings between sites.
- Essential Daily Workflows — How the lifecycle works day to day and what to verify before going live.
- Create and Configure Subscription Products — Detailed guide to all subscription billing fields, trials, signup fees, and different renewal pricing.
FAQ
Do I need to configure payment gateways before testing?
Not necessarily. For a basic test, you can use WooCommerce manual payment methods like "Check Payments." For testing automatic recurring charges, you need a supported gateway Pro like Stripe (test mode), PayPal (sandbox), or Paddle.
Will the subscription start immediately after checkout?
The subscription is created at checkout, but its status depends on the order. Once the order is marked as paid (Processing or Completed), the subscription becomes Active (or Trial, if a trial is configured).
Can I delete the test subscription afterward?
Yes. Go to ArraySubs → Subscriptions, find the test subscription, and trash it. You can also delete the test order from WooCommerce → Orders.
Do I need to flush permalinks after activation?
It is recommended. Go to Settings → Permalinks and click Save Changes once after first activation. This ensures the customer portal endpoints (Subscriptions, View Subscription) register correctly.
What if I want to change the subscription menu label in My Account?
Go to ArraySubs → Profile Builder → My Account and edit the Subscriptions item there. That editor controls the menu label and order for WooCommerce My Account.