
Checkout Builder
ProReplace the default WooCommerce classic checkout form with a fully customizable, multi-step checkout experience — drag and drop 28 element types, create section-based layouts, apply conditional visibility, and style every element to match your brand.
Availability: Pro
Page Navigation
- Current guide: Checkout Builder
- Where to open it: Storefront checkout and WordPress Admin -> ArraySubs -> Checkout Builder
- Direct route:
/wp-admin/admin.php?page=arraysubs-mainadmin#/checkout-builder - Section overview: Open overview
- Previous guide: field-types
- Next guide: use-cases
- Troubleshooting: Audits, Logs, and Troubleshooting
Overview
The Checkout Builder lets you redesign your classic WooCommerce checkout page without writing code. It provides a visual drag-and-drop editor where you arrange fields, sections, and layout elements into single-step or multi-step checkout flows. Custom field data captured at checkout flows through to orders, subscriptions, and renewal invoices automatically.
For the builder layout to apply on the frontend, use the classic WooCommerce checkout page or place the [woocommerce_checkout] shortcode on your checkout page. WooCommerce Checkout block and Store API flows can still participate in supported data handling, but the visual builder layout and multi-step arrangement are not applied the same way.
Navigation: ArraySubs → Checkout Builder
When to Use This
- You need to collect information at checkout that WooCommerce doesn't provide (company size, dietary preferences, delivery instructions, file uploads, T-shirt sizes, etc.)
- You want a multi-step checkout to reduce form fatigue and increase conversions
- You need to reorganize the default WooCommerce checkout layout (move fields, group them differently, add section headings)
- You want to customize the checkout's visual design — colors, spacing, border radius, and step navigation style
- You need conditional fields that only appear based on what the customer has already entered
The Builder Interface
Opening the Builder
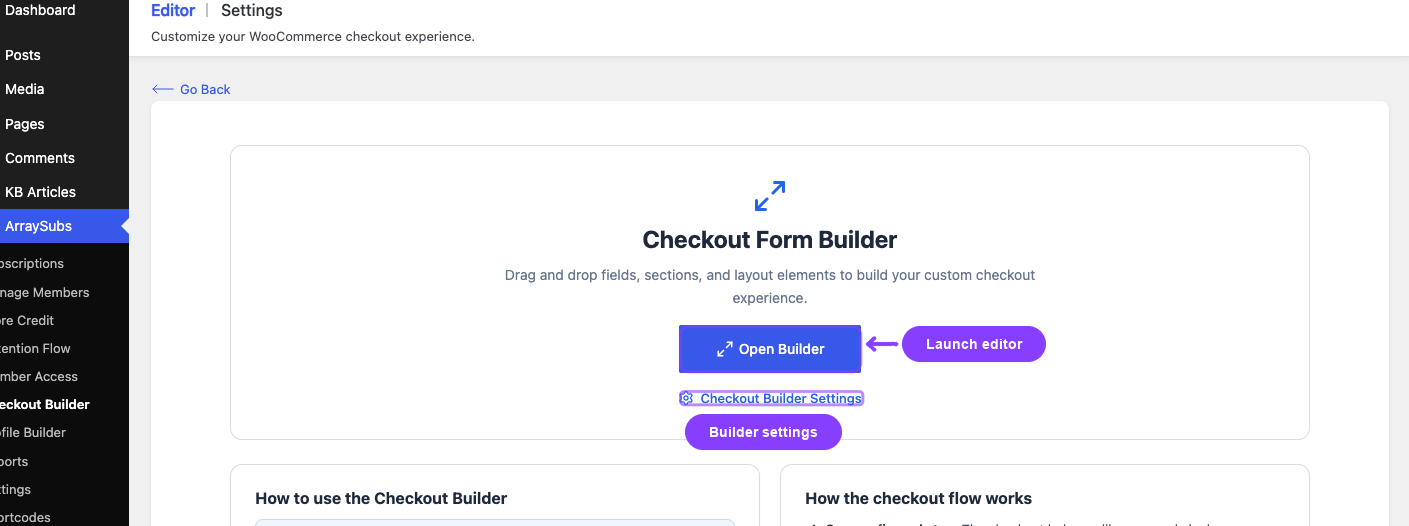
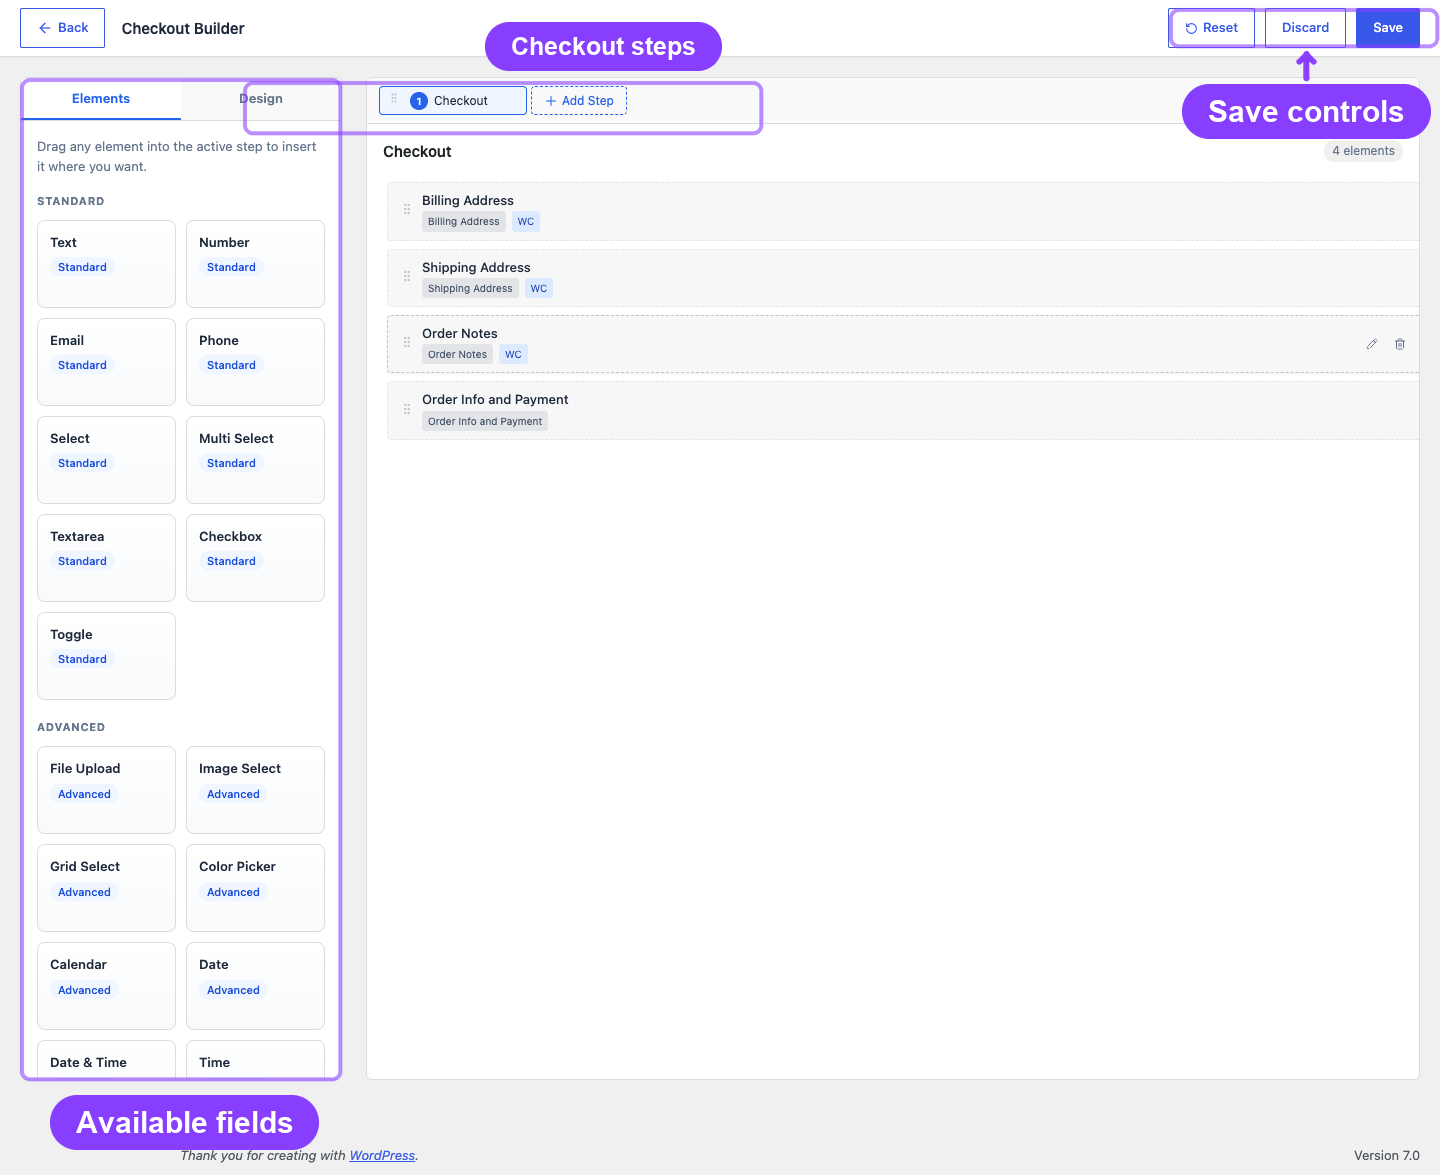
Go to ArraySubs → Checkout Builder and click Open Builder. The editor opens in full-screen mode with a toolbar at the top for Save, Discard, and Reset actions.
Layout
The builder has two main areas:
Left sidebar (~320px) — switches between two tabs:
| Tab | Purpose |
|---|---|
| Elements | Draggable palette of all 28 element types, grouped by category (Standard, Advanced, Layout) |
| Design | Visual design settings: colors, layout, spacing, and step navigation style |
When you select a field in the editor, the left sidebar switches to show that field's settings (label, key, placeholder, required toggle, CSS class, type-specific options, and Show When visibility rules when another input field can be referenced). Click the back arrow to return to the Elements palette.
Right panel (editor area) — shows the step tabs at the top and the field grid below. Drag elements from the palette into this area to build your checkout form.
Steps and Multi-Step Checkout
- One step: The checkout renders as a single page with no step navigation
- Two or more steps: The checkout becomes a multi-step form with navigation buttons (Previous/Next) and a step indicator
To add a step, click + Add Step in the step tab bar. Each step has a name and an icon that appear in the step indicator. Steps can be reordered by dragging their tabs.
Step navigation behavior:
- Customers can move between steps freely (Previous/Next buttons or clicking a step in the indicator)
- Validation runs only when the customer submits the final step — not during step transitions
- This reduces friction for customers who want to review earlier steps before submitting
Drag-and-Drop
Adding fields: Drag an element from the left palette and drop it into the step's field grid.
Reordering: Drag fields within a step to change their order. Drag between steps by moving a field to a different step tab.
Sections with columns: Section elements are container blocks that support 1, 2, or 3 column layouts. Drop fields into any column within a section for side-by-side layouts.
Field Categories and Types
The builder includes 28 element types across three categories. See the Field Types Reference for complete details on every field.
Standard Input Fields (9 types)
These are traditional form inputs that the customer fills in:
| Type | Description |
|---|---|
| Text | Single-line text input |
| Number | Numeric input with optional min/max validation |
| Email address with format validation | |
| Phone | Phone number with format validation |
| Select | Dropdown with predefined options |
| Multi-Select | Searchable dropdown allowing multiple selections |
| Textarea | Multi-line text area |
| Checkbox | Single boolean checkbox |
| Toggle | On/off switch (visual alternative to checkbox) |
Advanced Input Fields (9 types)
Specialized inputs for richer data collection:
| Type | Description |
|---|---|
| File Upload | File attachment (images, PDFs, documents) |
| Image Select | Choose from a grid of images |
| Grid Select | Choose from a grid of option cards with descriptions |
| Color Picker | Select a color using a visual picker |
| Calendar | Date picker with calendar widget |
| Date | Date input with format options |
| Date & Time | Combined date and time input |
| Time | Time picker (12-hour or 24-hour) |
| Date Range | Start and end date pair |
Layout Elements (10 types)
Structural and display elements that don't collect data:
| Type | Purpose |
|---|---|
| Product Table | Product selector/table that can add products from checkout |
| Heading | Section heading (H2, H3, or H4) |
| Section | Container with 1–3 column layout |
| Paragraph | Descriptive text block |
| Alert | Callout box (info, success, warning, or error style) |
| Billing Address | WooCommerce billing address composite |
| Shipping Address | WooCommerce shipping address composite |
| Order Notes | WooCommerce order notes section |
| Coupon and Notices | Coupon form and WooCommerce checkout notices |
| Order Info and Payment | Order review table and payment method selector |
The Order Info and Payment element is required and can only appear once. It renders WooCommerce's order summary and payment buttons. The builder ensures this element is always present — if you remove it, it is automatically re-added at the end of your last step.
Locked Fields
Four WooCommerce fields are locked and cannot be removed from the checkout:
- Billing Email
- Billing First Name
- Billing Last Name
- Billing Country
These fields appear with a lock icon in the builder. You can reorder them, move them to a different step, or change their position in a section, but you cannot delete them. WooCommerce requires these for order processing.
Conditional Visibility
Any field can have visibility rules that show or hide it based on the value of another field.
How to Add Rules
- Select a field in the editor
- In the left sidebar, scroll to Visibility
- Click Add Condition under Show When
- Configure: reference field → operator → value → logic
Available Operators
| Operator | Behavior |
|---|---|
is |
Field value equals the specified value |
is_not |
Field value does not equal the specified value |
contains |
Field value contains the specified text |
is_empty |
Field has no value |
is_not_empty |
Field has a value |
Rule Behavior
- Rules include a Logic selector. Use AND when all conditions must match, or OR when any condition should allow the field to show. Empty or omitted logic defaults to AND.
- Rules are evaluated in real time as the customer fills in the form
- Hidden fields are not validated and not submitted — they are as if they don't exist when hidden
- You can reference any field within the same step or any previous step
Example
A "Company Name" text field that only appears when a "Customer Type" select is set to "Business":
- Reference field:
customer_type - Operator:
is - Value:
business
Section Columns
Section elements support multi-column layouts for side-by-side field placement.
| Columns | Layout |
|---|---|
| 1 column | Full width — fields stack vertically (default) |
| 2 columns | Two equal columns side by side |
| 3 columns | Three equal columns side by side |
Drop fields into any column within a section. Fields within a column stack vertically. The layout is responsive — columns collapse to full width on mobile devices.
Design Panel
The Design tab in the left sidebar controls the visual appearance of the entire checkout form.
Color Settings
| Setting | Default | Controls |
|---|---|---|
| Color scheme | light |
Preset: light, dark, or custom |
| Primary color | #2563eb |
Buttons, links, active step indicators |
| Secondary color | #64748b |
Secondary text, inactive elements |
| Accent color | #10b981 |
Success states, positive indicators |
| Error color | #ef4444 |
Validation errors, required field highlights |
| Background color | #ffffff |
Form background |
| Text color | #1e293b |
Body text |
Layout Settings
| Setting | Default | Controls |
|---|---|---|
| Container width | medium (860px) |
Options: narrow (680px), medium (860px), wide (1080px), full (100%) |
| Custom max width | — | Override with a specific pixel value |
| Border radius | 8px |
Roundness of all form elements (0–24px) |
| Spacing | comfortable |
Options: compact, comfortable, spacious |
Step Navigation Settings
| Setting | Default | Controls |
|---|---|---|
| Step position | top |
Where steps appear: top (horizontal tabs), left (vertical sidebar), hidden |
| Step indicator style | numbers |
How steps are shown: numbers, dots, progress-bar |
All design changes apply via CSS custom properties and update in real time as you adjust them in the builder.
Checkout Builder Settings
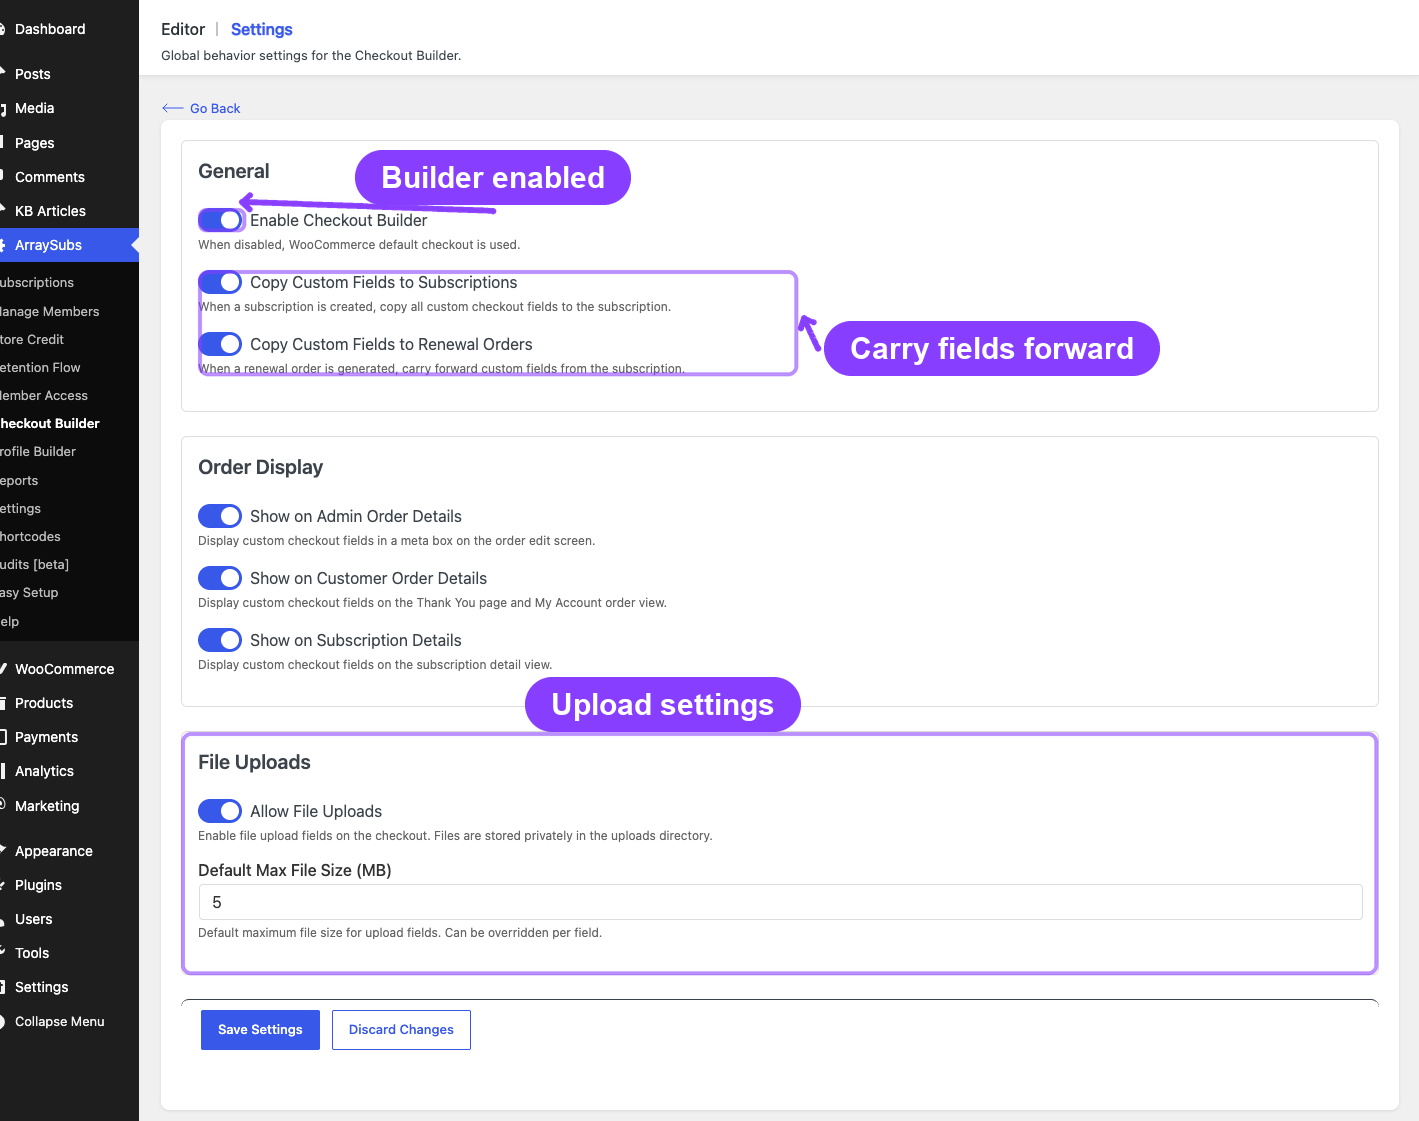
A separate settings page at ArraySubs → Checkout Builder → Settings controls global behavior.
Master Toggle
| Setting | Default | Effect |
|---|---|---|
| Enable Checkout Builder | Off | Turns the entire Checkout Builder on or off. When off, the default WooCommerce checkout renders normally. |
Data Flow Settings
| Setting | Default | Effect |
|---|---|---|
| Copy Custom Fields to Subscriptions | Off | Copies all custom field values from the checkout order to the subscription record's meta data |
| Copy Custom Fields to Renewal Orders | Off | Copies custom field values from the subscription to each renewal order created by the billing engine |
| Show on Admin Order Details | Off | Displays custom field values in a meta box on the WooCommerce admin order edit screen |
| Show on Customer Order Details | Off | Displays custom field values on the customer's order detail page (My Account -> Orders -> View order) |
| Show on Subscription Details | Off | Includes custom field values in the subscription detail REST API response and admin subscription detail view |
File Upload Settings
| Setting | Default | Effect |
|---|---|---|
| Allow File Uploads | Off | Master toggle for file upload fields. Upload fields will not render at checkout unless this is on. |
| Default Max File Size (MB) | 5 MB | Maximum file size per upload in megabytes |
The Copy Custom Fields to Subscriptions setting is important for subscription stores. Without it, custom field data only lives on the original checkout order. Enable it to ensure subscription detail pages and renewal orders carry the captured data forward.
Data Flow: From Checkout to Subscription
Custom field data follows a clear path through your system:
At Checkout
- Customer fills in custom fields during checkout
- On form submission, all custom fields are validated (type-specific checks: email format, number range, phone pattern, date parsing, file type/size)
- Custom field values are saved as order meta with the prefix
_arraysubs_cf_(e.g.,_arraysubs_cf_company_name)
After Checkout
- If Copy Custom Fields to Subscriptions is enabled, all
_arraysubs_cf_*meta values are copied from the order to the subscription post meta - On each future renewal, if Copy Custom Fields to Renewal Orders is enabled, values are copied from the subscription to the new renewal order
Display
- Admin order edit screen shows custom fields if Show on Admin Order Details is enabled
- Customer order detail page shows custom fields if Show on Customer Order Details is enabled
- Subscription detail REST response includes custom fields if Show on Subscription Details is enabled
File Uploads
Uploaded files are stored in wp-content/uploads/arraysubs-checkout-uploads/{order_id}/ as private WordPress attachments, not publicly browsable. The meta value stores the attachment ID, and files can be downloaded from the order or subscription detail view.
Frontend Rendering
Classic Checkout
The builder hooks into WooCommerce's woocommerce_checkout_fields filter at high priority (999) to patch the default checkout fields. It:
- Reorders fields according to the builder layout
- Injects custom fields at the appropriate positions
- Adds CSS step classes for multi-step navigation
- Relocates the coupon form and notices according to builder config
Non-standard field types (File Upload, Image Select, Color Picker, etc.) are rendered through additional hooks after the billing and shipping address sections.
WooCommerce Checkout Block
The current admin UI warns that the builder layout is intended for the classic checkout page or the [woocommerce_checkout] shortcode. Store API / block checkout integration can save supported custom field data, but the editor's layout, element order, and multi-step flow are not rendered the same way as the classic checkout builder layout. Use classic checkout when you need the visual arrangement shown in the builder.
Assets
These CSS/JS bundles are loaded on the checkout page as needed:
arraysubspro-checkout-builder.css— Layout and design stylesarraysubspro-checkout-builder.js— Step navigation, conditional visibility, and interactionsarraysubspro-checkout-upload.js— File upload handling (loaded only when upload fields are present)
Product Table Field
The Product Table is a special layout element that displays a list of products directly on the checkout page, allowing customers to add products to their cart without leaving checkout.
Configuration
| Option | Description |
|---|---|
| Product IDs | Specific products to display |
| Category IDs | Display all products from selected categories |
| Columns | Toggle which columns appear: thumbnail, title, quantity, SKU, price, sale price, short description |
Behavior
- Products shown in the table have "Add to Cart" buttons
- When a product is added, the cart updates via AJAX without page reload
- Products already in the cart show their current quantity
- Unavailable products (out of stock, restricted) show the unavailability reason
Real-Life Use Cases
See Checkout Builder Use Cases for 15+ detailed real-world examples covering subscription boxes, SaaS onboarding, membership portals, event registrations, and more.
Edge Cases and Important Notes
- Builder disabled: When the Checkout Builder is turned off in settings, the standard WooCommerce checkout renders normally. All previously saved builder configuration is preserved and restored when you re-enable it.
- Missing Order Info and Payment: If you delete the Order Info and Payment element, the builder automatically adds it back at the end of your last step on save. The checkout form cannot render without it.
- Conditional fields not submitted: Fields hidden by conditional visibility rules are excluded from both validation and submission. The customer can never submit data for a hidden field, even if it was partially filled before being hidden.
- Renewal orders and upload fields: File attachments referenced by attachment ID are copied as meta to renewal orders, but the physical file is not duplicated. The renewal order links to the same attachment.
- WooCommerce address fields: The Billing Address and Shipping Address elements render WooCommerce's native address fields. You can configure which address fields are visible, their labels, and which countries are available — but the actual field rendering is WooCommerce's responsibility.
Troubleshooting
| Problem | Likely Cause | Solution |
|---|---|---|
| Custom fields not appearing at checkout | Builder not enabled | Go to Checkout Builder -> Settings and toggle Enable Checkout Builder on |
| File upload field not showing | File uploads not enabled | Enable Allow File Uploads in Checkout Builder Settings |
| Custom data missing on subscription | Subscription copy setting disabled | Enable Copy Custom Fields to Subscriptions in Checkout Builder Settings |
| Custom data missing on renewal orders | Renewal-order copy setting disabled | Enable Copy Custom Fields to Renewal Orders in Checkout Builder Settings |
| Multi-step navigation not showing | Only one step configured | Add a second step in the builder to activate multi-step mode |
| Field key collision | Two fields with the same slug | Each field's key must be unique. The builder auto-deduplicates when generating keys from labels, but manually entered keys must be unique. |
| Design changes not visible | CSS caching | Clear your browser cache and any server-side page cache |
| Conditional field validated when hidden | Old configuration bug | Re-save the builder. Hidden fields are excluded from validation in the current version. |
Related Docs
- Field Types Reference — Complete reference for all 28 element types
- Checkout Builder Use Cases — 15+ real-world examples
- Subscription Checkout — Core checkout rules and subscription creation
- Subscription Detail Cards — How custom fields appear on the admin subscription view
FAQ
Does the Checkout Builder work with Block Checkout?
Use classic checkout or the [woocommerce_checkout] shortcode when you need the builder layout, design settings, and multi-step flow to match the editor. Store API / block checkout paths can save supported custom field data, but the visual layout is not applied the same way.
Are custom fields included in WooCommerce order exports?
Custom fields are stored as order meta with the _arraysubs_cf_ prefix. WooCommerce's built-in CSV export includes custom meta fields, so they appear in exports.
Can I use the builder for non-subscription checkouts? Yes. The Checkout Builder modifies the WooCommerce checkout globally. All orders — subscription and regular — go through the customized form when the builder is enabled.
What happens to existing orders if I change the builder layout? Existing orders keep their saved custom field data. Layout changes only affect future checkouts. The display of custom fields on old orders depends on their meta keys, not the current layout.
Can I reset the builder to WooCommerce defaults? Yes. Use the Reset button in the builder toolbar to clear all custom configuration and return to the default WooCommerce checkout field layout.
How many steps can I create? There is no hard limit. In practice, 2–4 steps works best for most checkout flows. A minimum of 1 step is required.